Quick Summary
This post covers specific Vue project structures suited for different project sizes:
- Flat structure for small projects
- Atomic Design for scalable applications
- Modular approach for larger projects
- Feature Sliced Design for complex applications
- Micro frontends for enterprise-level solutions
Table of Contents
Open Table of Contents
- Introduction
- 1. Flat Structure: Perfect for Small Projects
- 2. Atomic Design: Scalable Component Organization
- 3. Modular Approach: Feature-Based Organization
- 4. Feature-Sliced Design: For Complex Applications
- 5. Micro Frontends: Enterprise-Level Solution
- Conclusion
- General Rules and Best Practices
- Additional Resources
Introduction
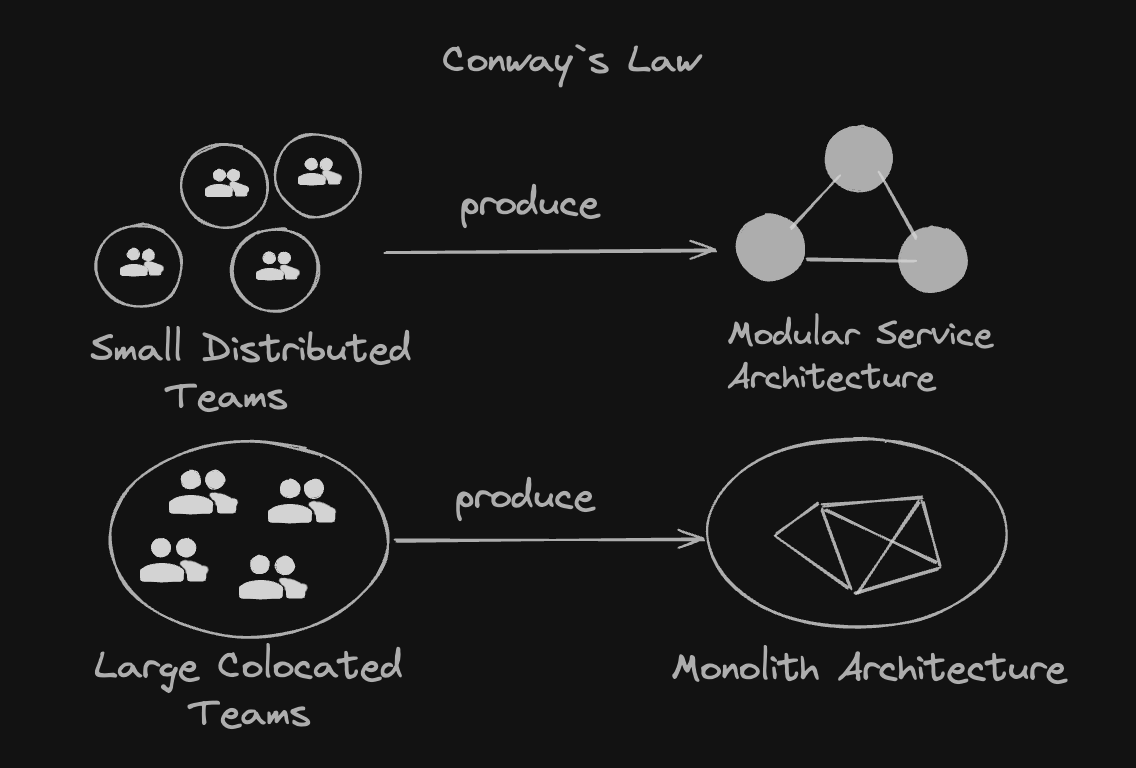
When starting a Vue project, one of the most critical decisions you’ll make is how to structure it. The right structure enhances scalability, maintainability, and collaboration within your team. This consideration aligns with Conway’s Law:
“Organizations which design systems are constrained to produce designs which are copies of the communication structures of these organizations.”
— Mel Conway
In essence, your Vue application’s architecture will reflect your organization’s structure, influencing how you should plan your project’s layout.
Whether you’re building a small app or an enterprise-level solution, this guide covers specific project structures suited to different scales and complexities.
1. Flat Structure: Perfect for Small Projects
Are you working on a small-scale Vue project or a proof of concept? A simple, flat folder structure might be the best choice to keep things straightforward and avoid unnecessary complexity.
Pros and Cons
| ✅ Pros | ❌ Cons |
|---|---|
| Easy to implement | Not scalable |
| Minimal setup | Becomes cluttered as the project grows |
| Ideal for small teams or solo developers | Lack of clear separation of concerns |
2. Atomic Design: Scalable Component Organization

For larger Vue applications, Atomic Design provides a clear structure. This approach organizes components into a hierarchy from simplest to most complex.
The Atomic Hierarchy
- Atoms: Basic elements like buttons and icons.
- Molecules: Groups of atoms forming simple components (e.g., search bars).
- Organisms: Complex components made up of molecules and atoms (e.g., navigation bars).
- Templates: Page layouts that structure organisms without real content.
- Pages: Templates filled with real content to form actual pages.
This method ensures scalability and maintainability, facilitating a smooth transition between simple and complex components.
Pros and Cons
| ✅ Pros | ❌ Cons |
|---|---|
| Highly scalable | Can introduce overhead in managing layers |
| Organized component hierarchy | Initial complexity in setting up |
| Reusable components | Might be overkill for smaller projects |
| Improves collaboration among teams |
3. Modular Approach: Feature-Based Organization
As your project scales, consider a Modular Monolithic Architecture. This structure encapsulates each feature or domain, enhancing maintainability and preparing for potential evolution towards microservices.
Alternative: Simplified Flat Feature Structure
A common pain point in larger projects is excessive folder nesting, which can make navigation and file discovery more difficult. Here’s a simplified, flat feature structure that prioritizes IDE-friendly navigation and reduces cognitive load:
This structure offers key advantages:
- Quick Navigation: Using IDE features like “Quick Open” (Ctrl/Cmd + P), you can find any project-related file by typing “project…”
- Reduced Nesting: All feature-related files are at the same level, eliminating deep folder hierarchies
- Clear Ownership: Each file’s name indicates its purpose
- Pattern Recognition: Consistent naming makes it simple to understand each file’s role
- Test Colocation: Tests live right next to the code they’re testing
4. Feature-Sliced Design: For Complex Applications
Feature-Sliced Design is ideal for big, long-term projects. This approach breaks the application into different layers, each with a specific role.
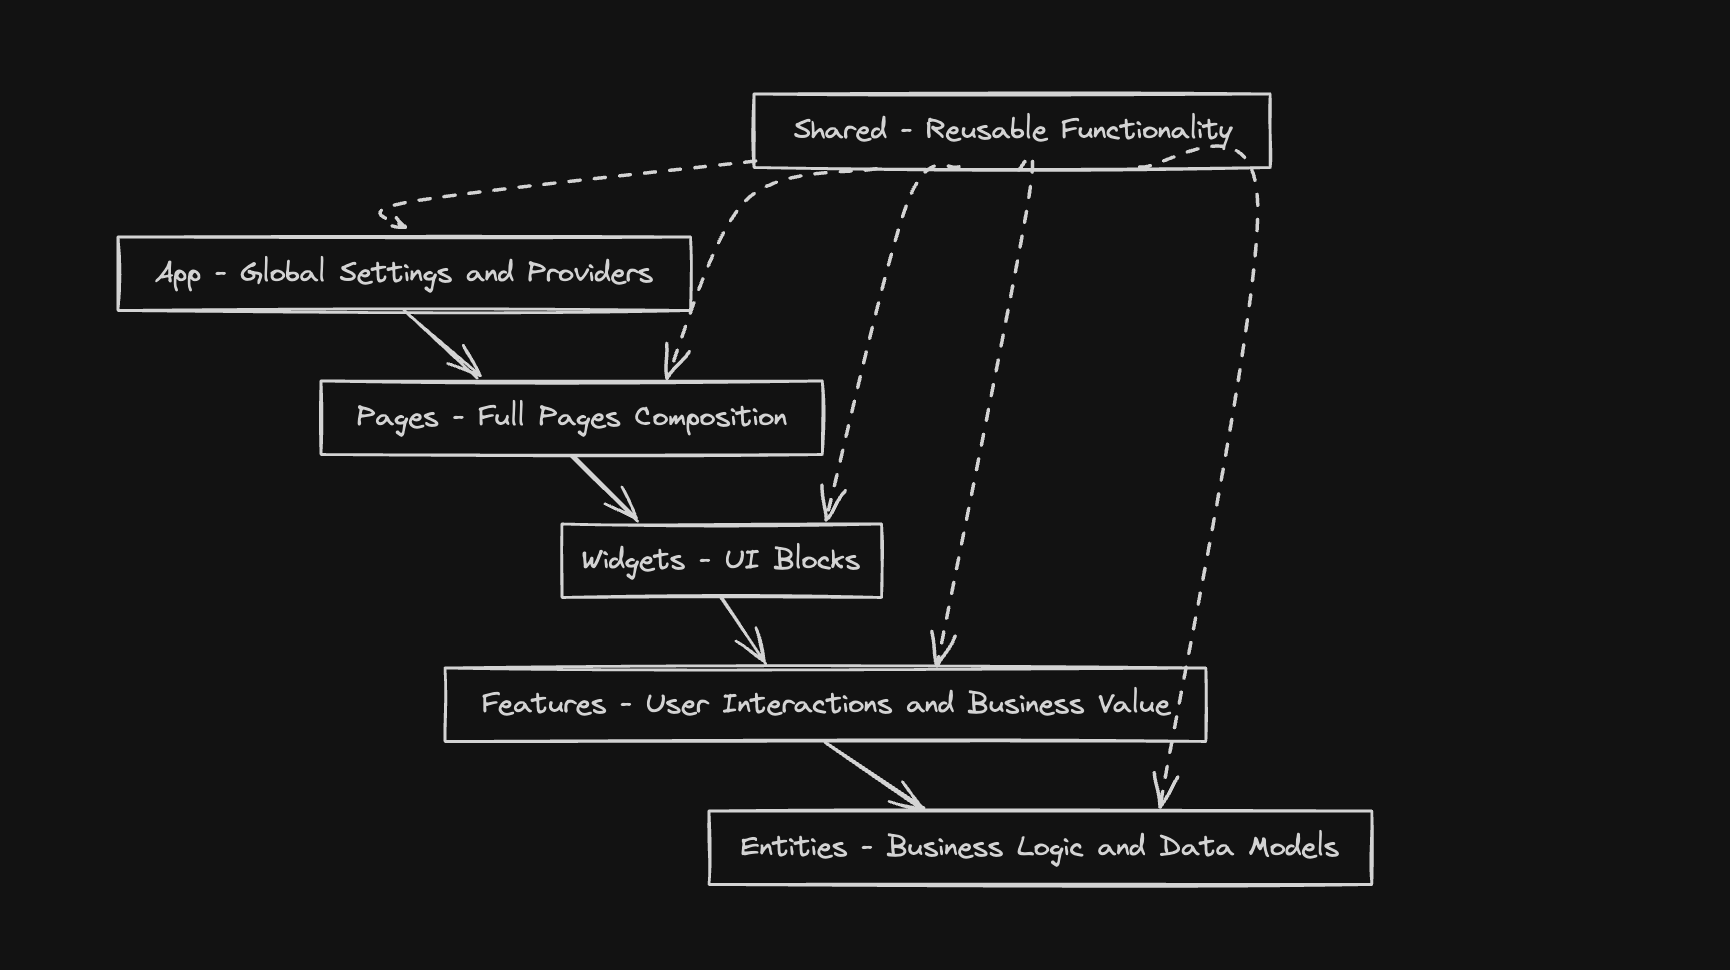
Layers of Feature-Sliced Design
- App: Global settings, styles, and providers.
- Processes: Global business processes, like user authentication flows.
- Pages: Full pages built using entities, features, and widgets.
- Widgets: Combines entities and features into cohesive UI blocks.
- Features: Handles user interactions that add value.
- Entities: Represents core business models.
- Shared: Reusable utilities and components unrelated to specific business logic.
Pros and Cons
| ✅ Pros | ❌ Cons |
|---|---|
| High cohesion and clear separation | Initial complexity in understanding the layers |
| Scalable and maintainable | Requires thorough planning |
| Facilitates team collaboration | Needs consistent enforcement of conventions |
5. Micro Frontends: Enterprise-Level Solution
Micro frontends apply the microservices concept to frontend development. Teams can work on distinct sections of a web app independently, enabling flexible development and deployment.
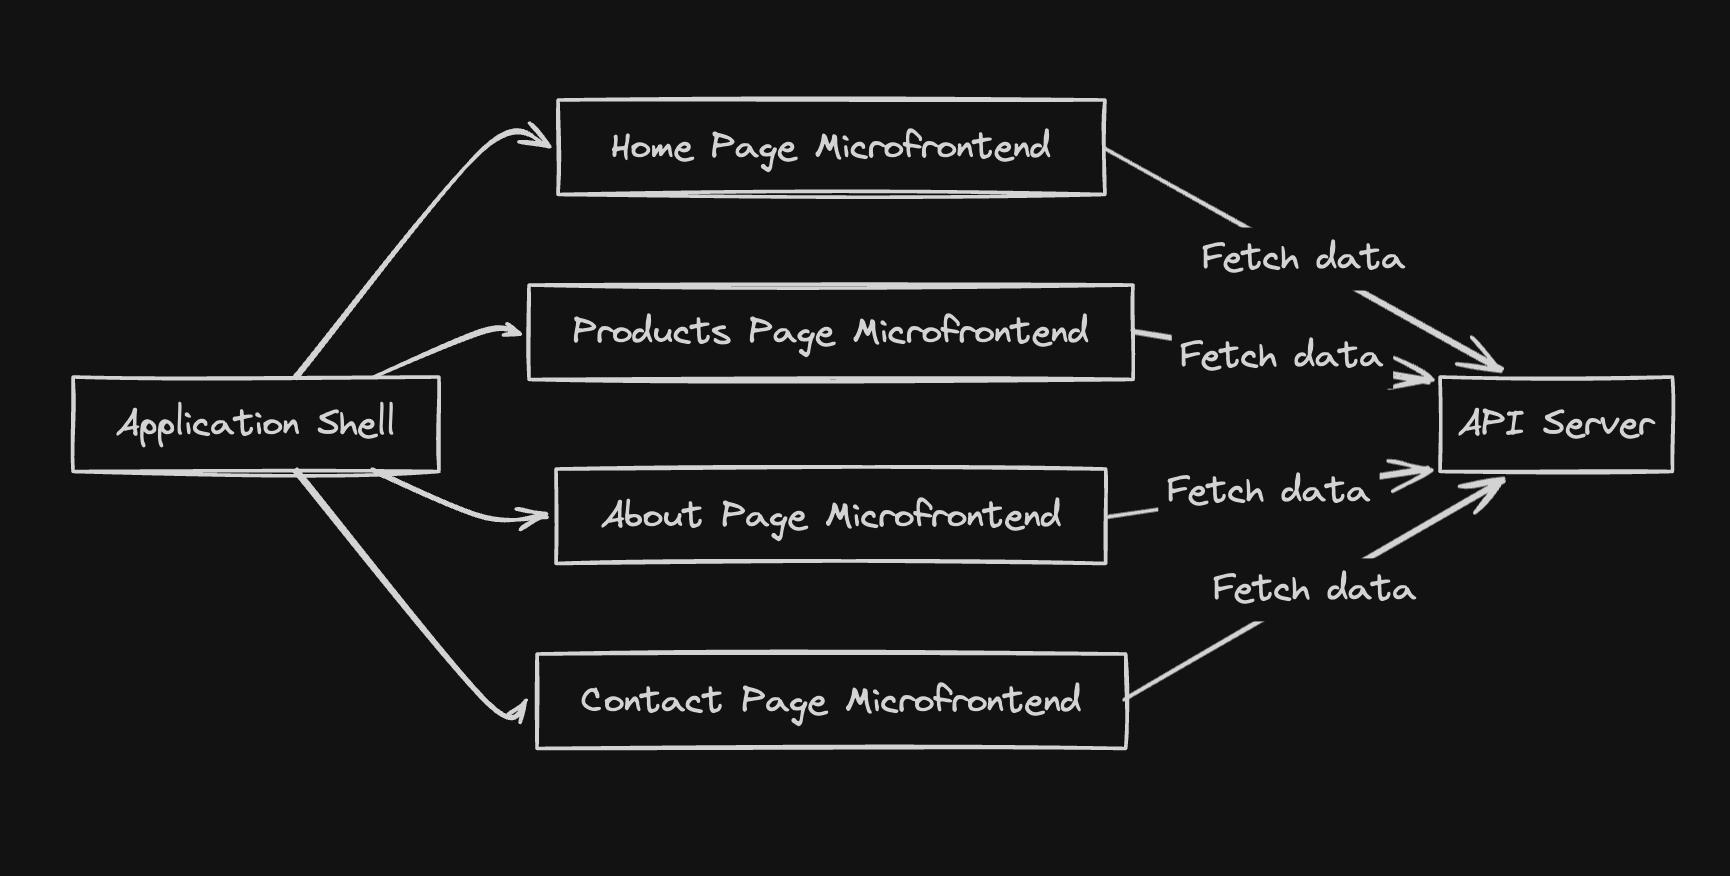
Key Components
- Application Shell: The main controller handling basic layout and routing, connecting all micro frontends.
- Decomposed UIs: Each micro frontend focuses on a specific part of the application using its own technology stack.
Pros and Cons
| ✅ Pros | ❌ Cons |
|---|---|
| Independent deployments | High complexity in orchestration |
| Scalability across large teams | Requires robust infrastructure |
| Technology-agnostic approach | Potential inconsistencies in user experience |
Conclusion
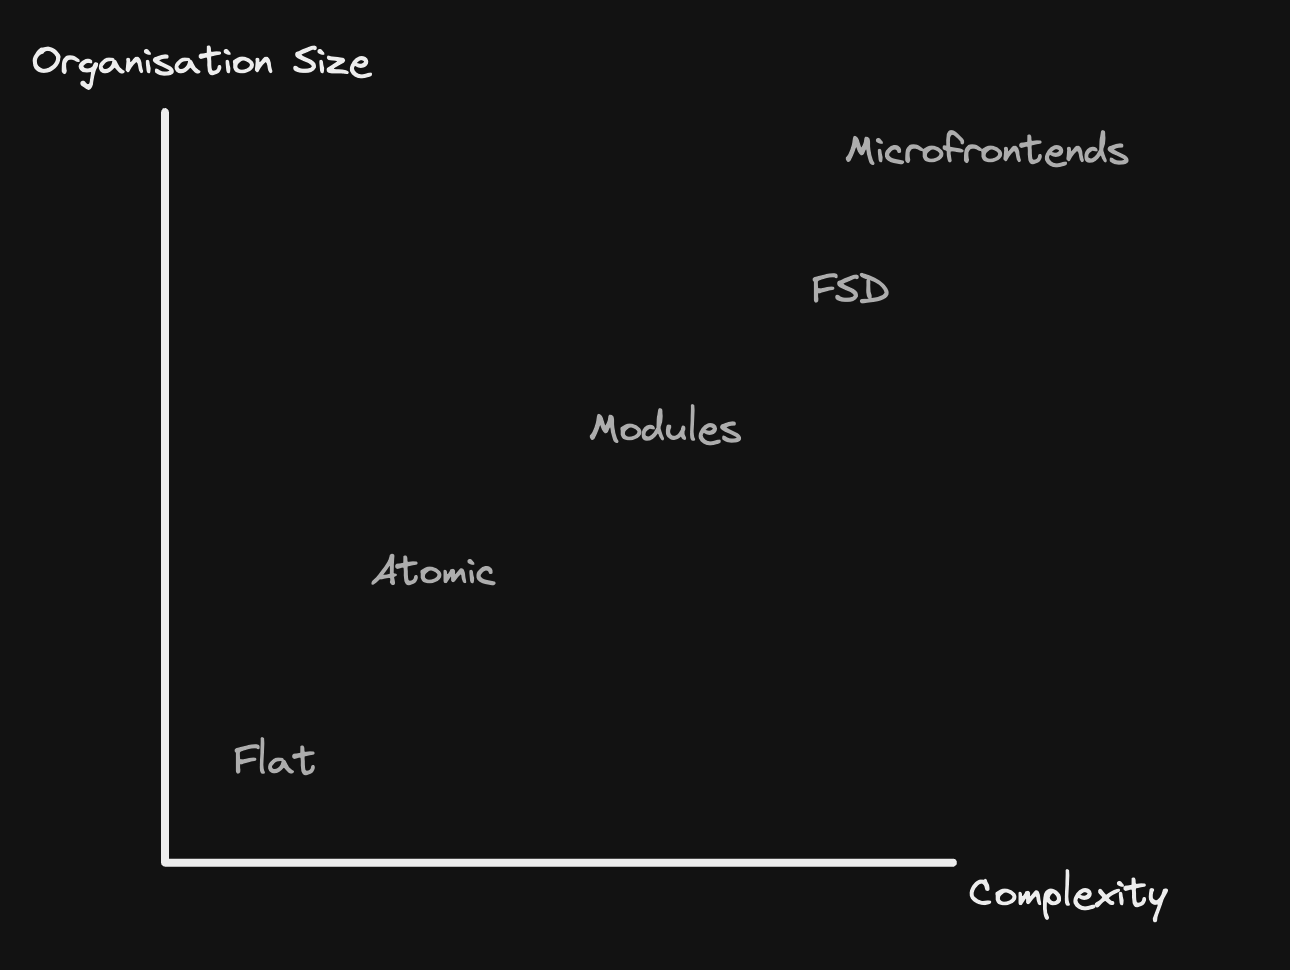
Selecting the right project structure depends on your project’s size, complexity, and team organization. The more complex your team or project is, the more you should aim for a structure that facilitates scalability and maintainability.
Your project’s architecture should grow with your organization, providing a solid foundation for future development.
Comparison Chart
| Approach | Description | ✅ Pros | ❌ Cons |
|---|---|---|---|
| Flat Structure | Simple structure for small projects | Easy to implement | Not scalable, can become cluttered |
| Atomic Design | Hierarchical component-based structure | Scalable, organized, reusable components | Overhead in managing layers, initial complexity |
| Modular Approach | Feature-based modular structure | Scalable, encapsulated features | Potential duplication, requires discipline |
| Feature-Sliced Design | Functional layers and slices for large projects | High cohesion, clear separation | Initial complexity, requires thorough planning |
| Micro Frontends | Independent deployments of frontend components | Independent deployments, scalable | High complexity, requires coordination between teams |
General Rules and Best Practices
Before concluding, let’s highlight some general rules you can apply to every structure. These guidelines are important for maintaining consistency and readability in your codebase.
Base Component Names
Use a prefix for your UI components to distinguish them from other components.
Bad:
Good:
Related Component Names
Group related components together by naming them accordingly.
Bad:
Good:
Order of Words in Component Names
Component names should start with the highest-level words and end with descriptive modifiers.
Bad:
Good:
Organizing Tests
Decide whether to keep your tests in a separate folder or alongside your components. Both approaches are valid, but consistency is key.
Approach 1: Separate Test Folder
Approach 2: Inline Test Files
Additional Resources
- Official Vue.js Style Guide
- Micro Frontends - Extending Microservice Ideas to Frontend Development
- Martin Fowler on Micro Frontends
- Official Feature-Sliced Design Documentation