Table of Contents
Open Table of Contents
- Introduction
- Understanding the Basics of Progressive Web Apps (PWAs)
- Prerequisites for Building a PWA with Vue 3 and Vite
- Step 1: Setting Up the Vue Project
- Step 2: Create the needed assets for the PWA
- Step 3: Configuring Vite for PWA Support
- PWA Lifecycle and Updates
- Step 4: Implementing Offline Functionality with Service Workers
- Testing Your PWA
- Conclusion
Introduction
Progressive Web Apps (PWAs) have revolutionized our thoughts on web applications. PWAs offer a fast, reliable, and engaging user experience by combining the best web and mobile apps. They work offline, can be installed on devices, and provide a native app-like experience without app store distribution.
This guide will walk you through creating a Progressive Web App using Vue 3 and Vite. By the end of this tutorial, you’ll have a fully functional PWA that can work offline, be installed on users’ devices, and leverage modern web capabilities.
Understanding the Basics of Progressive Web Apps (PWAs)
Before diving into the development process, it’s crucial to grasp the fundamental concepts of PWAs:
- Multi-platform Compatibility: PWAs are designed for applications that can function across multiple platforms, not just the web.
- Build Once, Deploy Everywhere: With PWAs, you can develop an application once and deploy it on Android, iOS, Desktop, and Web platforms.
- Enhanced User Experience: PWAs offer features like offline functionality, push notifications, and home screen installation.
For a more in-depth understanding of PWAs, refer to the MDN Web Docs on Progressive Web Apps.
Prerequisites for Building a PWA with Vue 3 and Vite
Before you start, make sure you have the following tools installed:
- Node.js installed on your system
- Package manager: pnpm, npm, or yarn
- Basic familiarity with Vue 3
Step 1: Setting Up the Vue Project
First, we’ll set up a new Vue project using the latest Vue CLI. This will give us a solid foundation to build our PWA upon.
-
Create a new Vue project by running the following command in your terminal:
pnpm create vue@latest -
Follow the prompts to configure your project. Here’s an example configuration:
✔ Project name: … local-first-example ✔ Add TypeScript? … Yes ✔ Add JSX Support? … Yes ✔ Add Vue Router for Single Page Application development? … Yes ✔ Add Pinia for state management? … Yes ✔ Add Vitest for Unit Testing? … Yes ✔ Add an End-to-End Testing Solution? › No ✔ Add ESLint for code quality? … Yes ✔ Add Prettier for code formatting? … Yes ✔ Add Vue DevTools 7 extension for debugging? (experimental) … Yes -
Once the project is created, navigate to your project directory and install dependencies:
cd local-first-example
pnpm install
pnpm run dev
Great! You now have a basic Vue 3 project up and running. Let’s move on to adding PWA functionality.
Step 2: Create the needed assets for the PWA
We need to add specific assets and configurations to transform our Vue app into a PWA. PWAs can be installed on various devices, so we must prepare icons and other assets for different platforms.
-
First, let’s install the necessary packages:
pnpm add -D vite-plugin-pwa @vite-pwa/assets-generator -
Create a high-resolution icon (preferably an SVG or a PNG with at least 512x512 pixels) for your PWA and place it in your
publicdirectory. Name it something likepwa-icon.svgorpwa-icon.png. -
Generate the PWA assets by running:
npx pwa-asset-generator --preset minimal public/pwa-icon.svg
This command will automatically generate a set of icons and a web manifest file in your public directory. The minimal preset will create:
- favicon.ico (48x48 transparent icon for browser tabs)
- favicon.svg (SVG icon for modern browsers)
- apple-touch-icon-180x180.png (Icon for iOS devices when adding to home screen)
- maskable-icon-512x512.png (Adaptive icon that fills the entire shape on Android devices)
- pwa-64x64.png (Small icon for various UI elements)
- pwa-192x192.png (Medium-sized icon for app shortcuts and tiles)
- pwa-512x512.png (Large icon for high-resolution displays and splash screens)
Output will look like this:
> vue3-pwa-timer@0.0.0 generate-pwa-assets /Users/your user/git2/vue3-pwa-example
> pwa-assets-generator "--preset" "minimal-2023" "public/pwa-icon.svg"

Zero Config PWA Assets Generator v0.2.6
◐ Preparing to generate PWA assets...
◐ Resolving instructions...
✔ PWA assets ready to be generated, instructions resolved
◐ Generating PWA assets from public/pwa-icon.svg image
◐ Generating assets for public/pwa-icon.svg...
✔ Generated PNG file: /Users/your user/git2/vue3-pwa-example/public/pwa-64x64.png
✔ Generated PNG file: /Users/your user/git2/vue3-pwa-example/public/pwa-192x192.png
✔ Generated PNG file: /Users/your user/git2/vue3-pwa-example/public/pwa-512x512.png
✔ Generated PNG file: /Users/your user/git2/vue3-pwa-example/public/maskable-icon-512x512.png
✔ Generated PNG file: /Users/your user/git2/vue3-pwa-example/public/apple-touch-icon-180x180.png
✔ Generated ICO file: /Users/your user/git2/vue3-pwa-example/public/favicon.ico
✔ Assets generated for public/pwa-icon.svg
◐ Generating Html Head Links...
<link rel="icon" href="/favicon.ico" sizes="48x48">
<link rel="icon" href="/pwa-icon.svg" sizes="any" type="image/svg+xml">
<link rel="apple-touch-icon" href="/apple-touch-icon-180x180.png">
✔ Html Head Links generated
◐ Generating PWA web manifest icons entry...
{
  "icons": [
    {
      "src": "pwa-64x64.png",
      "sizes": "64x64",
      "type": "image/png"
    },
    {
      "src": "pwa-192x192.png",
      "sizes": "192x192",
      "type": "image/png"
    },
    {
      "src": "pwa-512x512.png",
      "sizes": "512x512",
      "type": "image/png"
    },
    {
      "src": "maskable-icon-512x512.png",
      "sizes": "512x512",
      "type": "image/png",
      "purpose": "maskable"
    }
  ]
}
✔ PWA web manifest icons entry generated
✔ PWA assets generated
These steps will ensure your PWA has all the necessary icons and assets to function correctly across different devices and platforms. The minimal-2023 preset provides a modern, optimized set of icons that meet the latest PWA requirements.
Step 3: Configuring Vite for PWA Support
With our assets ready, we must configure Vite to enable PWA functionality. This involves setting up the manifest and other PWA-specific options.
First, update your main HTML file (usually index.html) to include important meta tags in the <head> section:
<head>
  <meta charset="UTF-8" />
  <meta name="viewport" content="width=device-width, initial-scale=1.0" />
  <meta name="theme-color" content="#ffffff" />
  <link rel="icon" href="/favicon.ico" sizes="48x48" />
  <link rel="icon" href="/favicon.svg" sizes="any" type="image/svg+xml" />
  <link rel="apple-touch-icon" href="/apple-touch-icon-180x180.png" />
</head>
Now, update your vite.config.ts file with the following configuration:
import { fileURLToPath, URL } from "node:url";
import { VitePWA } from "vite-plugin-pwa";
import { defineConfig } from "vite";
import vue from "@vitejs/plugin-vue";

export default defineConfig({
  plugins: [
    vue(),
    VitePWA({
      registerType: "autoUpdate",
      includeAssets: [
        "favicon.ico",
        "apple-touch-icon-180x180.png",
        "maskable-icon-512x512.png",
      ],
      manifest: {
        name: "My Awesome PWA",
        short_name: "MyPWA",
        description: "A PWA built with Vue 3",
        theme_color: "#ffffff",
        icons: [
          {
            src: "pwa-64x64.png",
            sizes: "64x64",
            type: "image/png",
          },
          {
            src: "pwa-192x192.png",
            sizes: "192x192",
            type: "image/png",
          },
          {
            src: "pwa-512x512.png",
            sizes: "512x512",
            type: "image/png",
            purpose: "any",
          },
          {
            src: "maskable-icon-512x512.png",
            sizes: "512x512",
            type: "image/png",
            purpose: "maskable",
          },
        ],
      },
      devOptions: {
        enabled: true,
      },
    }),
  ],
});This configuration generates a Web App Manifest, a JSON file that tells the browser about your Progressive Web App and how it should behave when installed on the user’s desktop or mobile device. The manifest includes the app’s name, icons, and theme colors.
PWA Lifecycle and Updates
The registerType: 'autoUpdate' option in our configuration sets up automatic updates for our PWA. Here’s how it works:
- When a user visits your PWA, the browser downloads and caches the latest version of your app.
- On subsequent visits, the service worker checks for updates in the background.
- If an update is available, it’s downloaded and prepared for the next launch.
- The next time the user opens or refreshes the app, they’ll get the latest version.
This ensures that users always have the most up-to-date version of your app without manual intervention.
Step 4: Implementing Offline Functionality with Service Workers
The real power of PWAs comes from their ability to work offline. We’ll use the vite-plugin-pwa to integrate Workbox, which will handle our service worker and caching strategies.
Before we dive into the configuration, let’s understand the runtime caching strategies we’ll be using:
-
StaleWhileRevalidate for static resources (styles, scripts, and workers):
- This strategy serves cached content immediately while fetching an update in the background.
- It’s ideal for frequently updated resources that aren’t 100% up-to-date.
- We’ll limit the cache to 50 entries and set an expiration of 30 days.
-
CacheFirst for images:
- This strategy serves cached images immediately without network requests if they’re available.
- It’s perfect for static assets that don’t change often.
- We’ll limit the image cache to 100 entries and set an expiration of 60 days.
These strategies ensure that your PWA remains functional offline while efficiently managing cache storage.
Now, let’s update your vite.config.ts file to include service worker configuration with these advanced caching strategies:
import vue from "@vitejs/plugin-vue";
import { defineConfig } from "vite";
import { VitePWA } from "vite-plugin-pwa";

export default defineConfig({
  plugins: [
    vue(),
    VitePWA({
      devOptions: {
        enabled: true,
      },
      registerType: "autoUpdate",
      includeAssets: ["favicon.ico", "apple-touch-icon.png", "masked-icon.svg"],
      manifest: {
        name: "Vue 3 PWA Timer",
        short_name: "PWA Timer",
        description: "A customizable timer for Tabata and EMOM workouts",
        theme_color: "#ffffff",
        icons: [
          {
            src: "pwa-192x192.png",
            sizes: "192x192",
            type: "image/png",
          },
          {
            src: "pwa-512x512.png",
            sizes: "512x512",
            type: "image/png",
          },
        ],
      },
      workbox: {
        runtimeCaching: [
          {
            urlPattern: ({ request }) =>
              request.destination === "style" ||
              request.destination === "script" ||
              request.destination === "worker",
            handler: "StaleWhileRevalidate",
            options: {
              cacheName: "static-resources",
              expiration: {
                maxEntries: 50,
                maxAgeSeconds: 30 * 24 * 60 * 60, // 30 days
              },
            },
          },
          {
            urlPattern: ({ request }) => request.destination === "image",
            handler: "CacheFirst",
            options: {
              cacheName: "images",
              expiration: {
                maxEntries: 100,
                maxAgeSeconds: 60 * 24 * 60 * 60, // 60 days
              },
            },
          },
        ],
      },
    }),
  ],
});Testing Your PWA
Now that we’ve set up our PWA, it’s time to test its capabilities:
-
Test your PWA locally:
pnpm run dev -
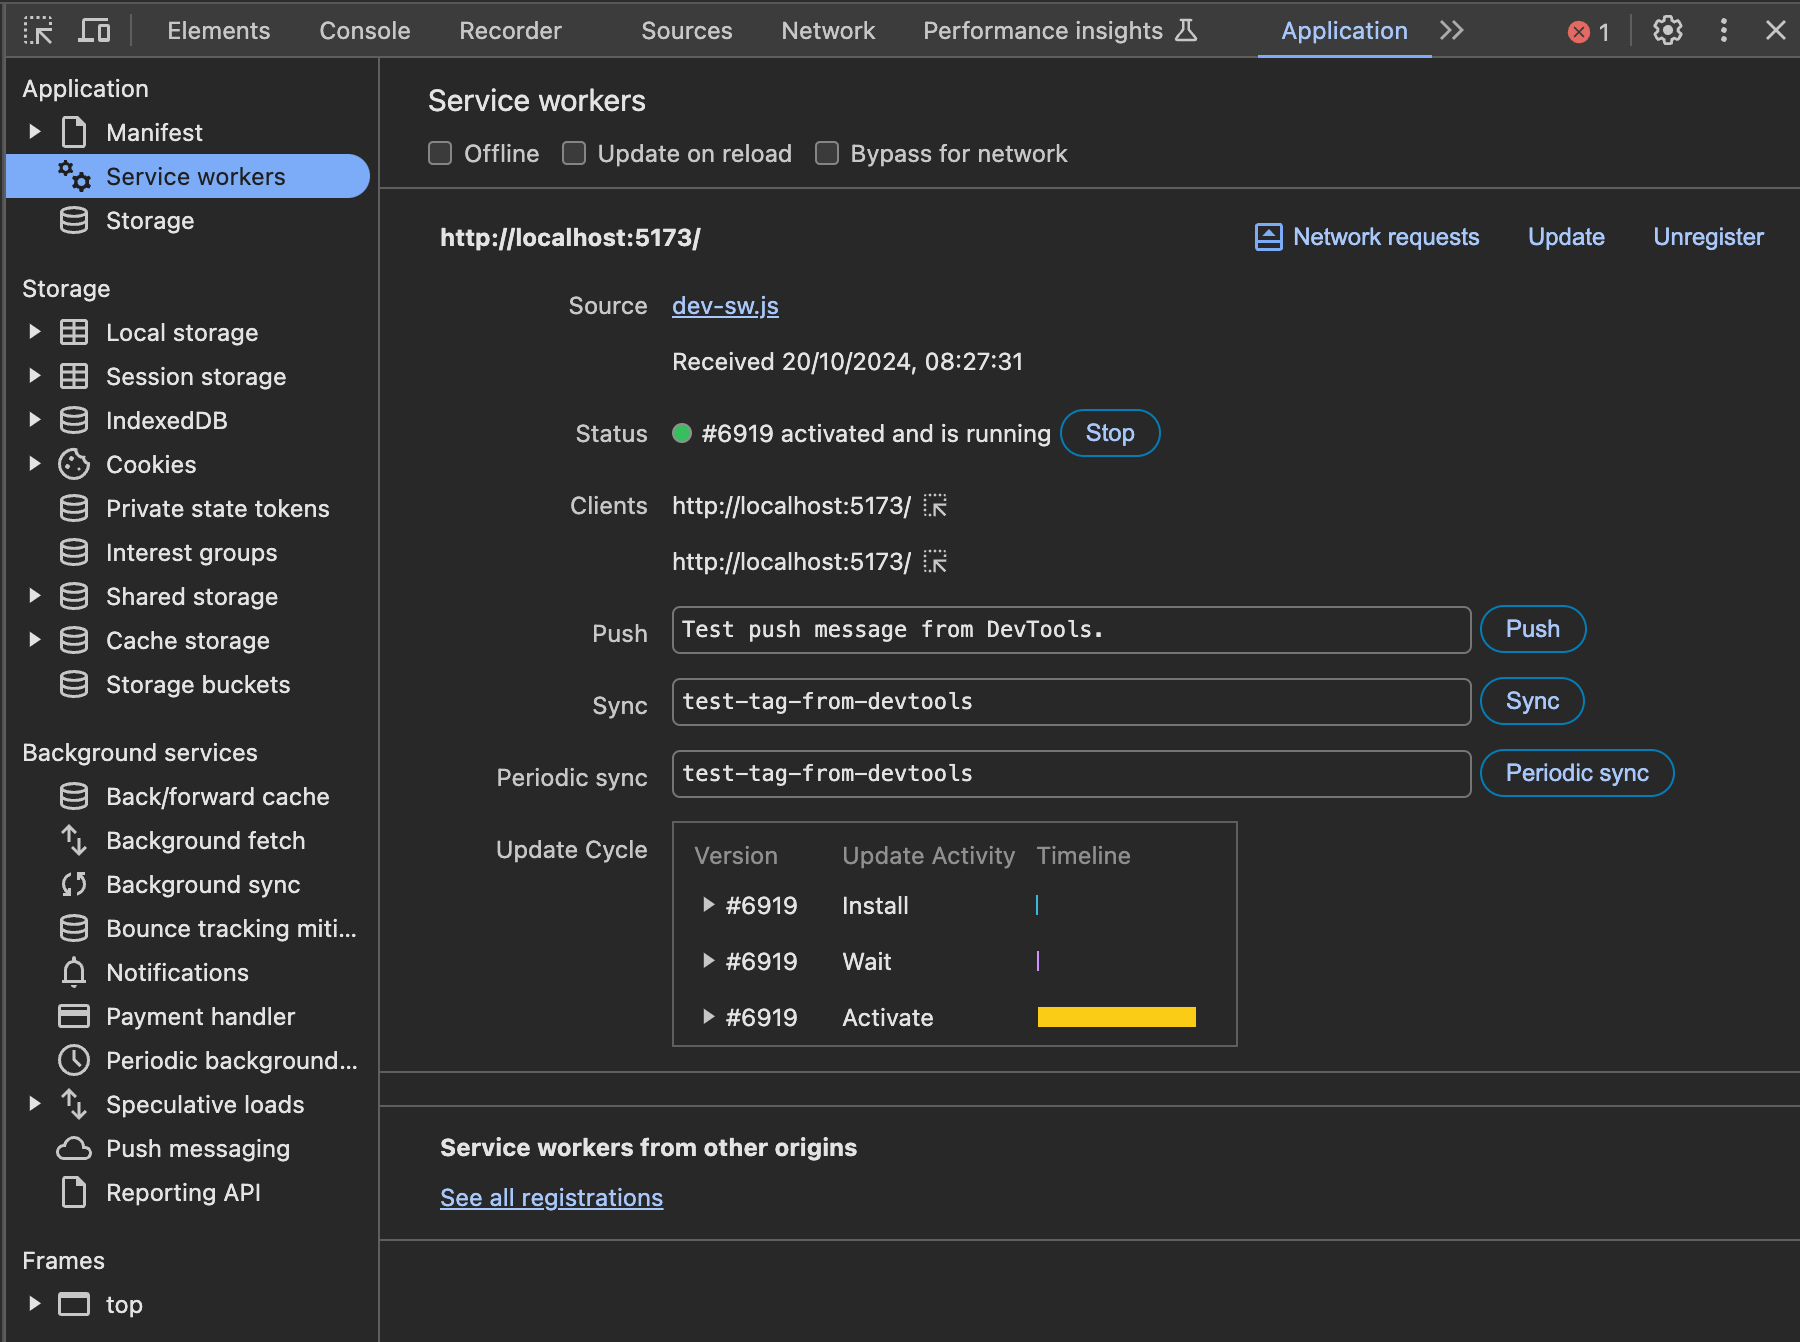
Open Chrome DevTools and navigate to the Application tab.
- Check the “Manifest” section to ensure your Web App Manifest is loaded correctly.
- In the “Service Workers” section, verify that your service worker is registered and active.
[
-
Test offline functionality:
- Go to the Network tab in DevTools and check the “Offline” box to simulate offline conditions.
- Refresh the page and verify that your app still works without an internet connection.
- Uncheck the “Offline” box and refresh to ensure the app works online.
-
Test caching:
- In the Application tab, go to “Cache Storage” to see the caches created by your service worker.
- Verify that assets are being cached according to your caching strategies.
-
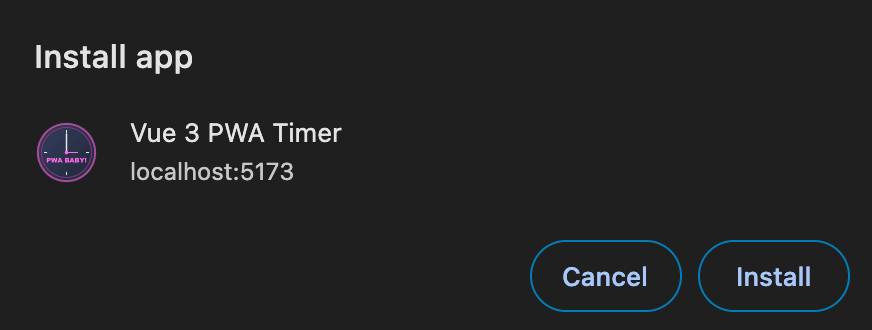
Test installation:
-
On desktop: Look for the install icon in the address bar or the three-dot menu.

-
On mobile: You should see a prompt to “Add to Home Screen”.
-
-
Test updates:
- Make a small change to your app and redeploy.
- Revisit the app and check if the service worker updates (you can monitor this in the Application tab).


By thoroughly testing these aspects, you can ensure that your PWA functions correctly across various scenarios and platforms.
Conclusion
Congratulations! You’ve successfully created a Progressive Web App using Vue 3 and Vite. Your app can now work offline, be installed on users’ devices, and provide a native-like experience.
Refer to the Vite PWA Workbox documentation for more advanced Workbox configurations and features.
The more challenging part is building suitable components with a native-like feel on all the devices you want to support. PWAs are also a main ingredient in building local-first applications. If you are curious about what I mean by that, check out the following: What is Local First Web Development.
For a complete working example of this Vue 3 PWA, you can check out the complete source code at full example. This repository contains the finished project, allowing you to see how all the pieces come together in a real-world application.