Introduction
Understanding the core of modern Frontend frameworks is crucial for every web developer. Vue, known for its reactivity system, offers a seamless way to update the DOM based on state changes. But have you ever wondered how it works under the hood?
In this tutorial, we’ll demystify Vue’s reactivity by building our own versions of ref()
and watchEffect()
. By the end, you’ll have a deeper understanding of reactive programming in frontend development.
What is Reactivity in Frontend Development?
Before we dive in, let’s define reactivity:
Reactivity: A declarative programming model for updating based on state changes.1
This concept is at the heart of modern frameworks like Vue, React, and Angular. Let’s see how it works in a simple Vue component:
<script setup>
import { function ref<T>(value: T): [T] extends [Ref] ? IfAny<T, Ref<T>, T> : Ref<UnwrapRef<T>, UnwrapRef<T> | T> (+1 overload)
Takes an inner value and returns a reactive and mutable ref object, which
has a single property `.value` that points to the inner value.ref } from 'vue'
const const counter: Ref<number, number>
counter = ref<number>(value: number): Ref<number, number> (+1 overload)
Takes an inner value and returns a reactive and mutable ref object, which
has a single property `.value` that points to the inner value.ref(0)
const const incrementCounter: () => void
incrementCounter = () => {
const counter: Ref<number, number>
counter.Ref<number, number>.value: number
value++
}
</script>
<template>
<div: HTMLAttributes & ReservedProps
div>
<h1: HTMLAttributes & ReservedProps
h1>Counter: {{ counter: number
counter }}</h1: HTMLAttributes & ReservedProps
h1>
<button: ButtonHTMLAttributes & ReservedProps
button @onClick?: ((payload: MouseEvent) => void) | undefined
click="incrementCounter: () => void
incrementCounter">Increment</button: ButtonHTMLAttributes & ReservedProps
button>
</div: HTMLAttributes & ReservedProps
div>
</template>
In this example:
- State Management:
ref
creates a reactive reference for the counter. - Declarative Programming: The template uses
{{ counter }}
to display the counter value. The DOM updates automatically when the state changes.
Building Our Own Vue-like Reactivity System
To create a basic reactivity system, we need three key components:
- A method to store data
- A way to track changes
- A mechanism to update dependencies when data changes
Key Components of Our Reactivity System
- A store for our data and effects
- A dependency tracking system
- An effect runner that activates when data changes
Understanding Effects in Reactive Programming
An effect
is a function that executes when a reactive state changes. Effects can update the DOM, make API calls, or perform calculations.
type type Effect = () => void
Effect = () => void;
This Effect
type represents a function that runs when a reactive state changes.
The Store
We’ll use a Map to store our reactive dependencies:
const const depMap: Map<object, Map<string | symbol, Set<Effect>>>
depMap: interface Map<K, V>
Map<object, interface Map<K, V>
Map<string | symbol, interface Set<T>
Set<type Effect = () => void
Effect>>> = new var Map: MapConstructor
new () => Map<any, any> (+3 overloads)
Map();
Implementing Key Reactivity Functions
The Track Function: Capturing Dependencies
This function records which effects depend on specific properties of reactive objects. It builds a dependency map to keep track of these relationships.
type type Effect = () => void
Effect = () => void;
let let activeEffect: Effect | null
activeEffect: type Effect = () => void
Effect | null = null;
const const depMap: Map<object, Map<string | symbol, Set<Effect>>>
depMap: interface Map<K, V>
Map<object, interface Map<K, V>
Map<string | symbol, interface Set<T>
Set<type Effect = () => void
Effect>>> = new var Map: MapConstructor
new () => Map<any, any> (+3 overloads)
Map();
function function track(target: object, key: string | symbol): void
track(target: object
target: object, key: string | symbol
key: string | symbol): void {
if (!let activeEffect: Effect | null
activeEffect) return;
let let dependenciesForTarget: Map<string | symbol, Set<Effect>> | undefined
dependenciesForTarget = const depMap: Map<object, Map<string | symbol, Set<Effect>>>
depMap.Map<object, Map<string | symbol, Set<Effect>>>.get(key: object): Map<string | symbol, Set<Effect>> | undefined
Returns a specified element from the Map object. If the value that is associated to the provided key is an object, then you will get a reference to that object and any change made to that object will effectively modify it inside the Map.get(target: object
target);
if (!let dependenciesForTarget: Map<string | symbol, Set<Effect>> | undefined
dependenciesForTarget) {
let dependenciesForTarget: Map<string | symbol, Set<Effect>> | undefined
dependenciesForTarget = new var Map: MapConstructor
new <string | symbol, Set<Effect>>(iterable?: Iterable<readonly [string | symbol, Set<Effect>]> | null | undefined) => Map<string | symbol, Set<Effect>> (+3 overloads)
Map<string | symbol, interface Set<T>
Set<type Effect = () => void
Effect>>();
const depMap: Map<object, Map<string | symbol, Set<Effect>>>
depMap.Map<object, Map<string | symbol, Set<Effect>>>.set(key: object, value: Map<string | symbol, Set<Effect>>): Map<object, Map<string | symbol, Set<Effect>>>
Adds a new element with a specified key and value to the Map. If an element with the same key already exists, the element will be updated.set(target: object
target, let dependenciesForTarget: Map<string | symbol, Set<Effect>>
dependenciesForTarget);
}
let let dependenciesForKey: Set<Effect> | undefined
dependenciesForKey = let dependenciesForTarget: Map<string | symbol, Set<Effect>>
dependenciesForTarget.Map<string | symbol, Set<Effect>>.get(key: string | symbol): Set<Effect> | undefined
Returns a specified element from the Map object. If the value that is associated to the provided key is an object, then you will get a reference to that object and any change made to that object will effectively modify it inside the Map.get(key: string | symbol
key);
if (!let dependenciesForKey: Set<Effect> | undefined
dependenciesForKey) {
let dependenciesForKey: Set<Effect> | undefined
dependenciesForKey = new var Set: SetConstructor
new <Effect>(iterable?: Iterable<Effect> | null | undefined) => Set<Effect> (+1 overload)
Set<type Effect = () => void
Effect>();
let dependenciesForTarget: Map<string | symbol, Set<Effect>>
dependenciesForTarget.Map<string | symbol, Set<Effect>>.set(key: string | symbol, value: Set<Effect>): Map<string | symbol, Set<Effect>>
Adds a new element with a specified key and value to the Map. If an element with the same key already exists, the element will be updated.set(key: string | symbol
key, let dependenciesForKey: Set<Effect>
dependenciesForKey);
}
let dependenciesForKey: Set<Effect>
dependenciesForKey.Set<Effect>.add(value: Effect): Set<Effect>
Appends a new element with a specified value to the end of the Set.add(let activeEffect: Effect
activeEffect);
}
The Trigger Function: Activating Effects
When a reactive property changes, this function is called to activate all the effects that depend on that property. It uses the dependency map created by the track function.
function function trigger(target: object, key: string | symbol): void
trigger(target: object
target: object, key: string | symbol
key: string | symbol): void {
const const depsForTarget: Map<string | symbol, Set<Effect>> | undefined
depsForTarget = const depMap: Map<object, Map<string | symbol, Set<Effect>>>
depMap.Map<object, Map<string | symbol, Set<Effect>>>.get(key: object): Map<string | symbol, Set<Effect>> | undefined
Returns a specified element from the Map object. If the value that is associated to the provided key is an object, then you will get a reference to that object and any change made to that object will effectively modify it inside the Map.get(target: object
target);
if (const depsForTarget: Map<string | symbol, Set<Effect>> | undefined
depsForTarget) {
const const depsForKey: Set<Effect> | undefined
depsForKey = const depsForTarget: Map<string | symbol, Set<Effect>>
depsForTarget.Map<string | symbol, Set<Effect>>.get(key: string | symbol): Set<Effect> | undefined
Returns a specified element from the Map object. If the value that is associated to the provided key is an object, then you will get a reference to that object and any change made to that object will effectively modify it inside the Map.get(key: string | symbol
key);
if (const depsForKey: Set<Effect> | undefined
depsForKey) {
const depsForKey: Set<Effect>
depsForKey.Set<Effect>.forEach(callbackfn: (value: Effect, value2: Effect, set: Set<Effect>) => void, thisArg?: any): void
Executes a provided function once per each value in the Set object, in insertion order.forEach(effect: Effect
effect => effect: () => void
effect());
}
}
}
Implementing ref: Creating Reactive References
This creates a reactive reference to a value. It wraps the value in an object with getter and setter methods that track access and trigger updates when the value changes.
class class RefImpl<T>
RefImpl<function (type parameter) T in RefImpl<T>
T> {
private RefImpl<T>._value: T
_value: function (type parameter) T in RefImpl<T>
T;
constructor(value: T
value: function (type parameter) T in RefImpl<T>
T) {
this.RefImpl<T>._value: T
_value = value: T
value;
}
get RefImpl<T>.value: T
value(): function (type parameter) T in RefImpl<T>
T {
track(this, 'value');
return this.RefImpl<T>._value: T
_value;
}
set RefImpl<T>.value: T
value(newValue: T
newValue: function (type parameter) T in RefImpl<T>
T) {
if (newValue: T
newValue !== this.RefImpl<T>._value: T
_value) {
this.RefImpl<T>._value: T
_value = newValue: T
newValue;
trigger(this, 'value');
}
}
}
function function ref<T>(initialValue: T): RefImpl<T>
ref<function (type parameter) T in ref<T>(initialValue: T): RefImpl<T>
T>(initialValue: T
initialValue: function (type parameter) T in ref<T>(initialValue: T): RefImpl<T>
T): class RefImpl<T>
RefImpl<function (type parameter) T in ref<T>(initialValue: T): RefImpl<T>
T> {
return new constructor RefImpl<T>(value: T): RefImpl<T>
RefImpl(initialValue: T
initialValue);
}
Creating watchEffect: Reactive Computations
This function creates a reactive computation. It runs the provided effect function immediately and re-runs it whenever any reactive values used within the effect change.
function function watchEffect(effect: Effect): void
watchEffect(effect: Effect
effect: type Effect = /*unresolved*/ any
Effect): void {
function function (local function) wrappedEffect(): void
wrappedEffect() {
activeEffect = function (local function) wrappedEffect(): void
wrappedEffect;
effect: Effect
effect();
activeEffect = null;
}
function (local function) wrappedEffect(): void
wrappedEffect();
}
Putting It All Together: A Complete Example
Let’s see our reactivity system in action:
const const countRef: any
countRef = ref(0);
const const doubleCountRef: any
doubleCountRef = ref(0);
watchEffect(() => {
var console: Console
The `console` module provides a simple debugging console that is similar to the
JavaScript console mechanism provided by web browsers.
The module exports two specific components:
* A `Console` class with methods such as `console.log()`, `console.error()` and `console.warn()` that can be used to write to any Node.js stream.
* A global `console` instance configured to write to [`process.stdout`](https://nodejs.org/docs/latest-v22.x/api/process.html#processstdout) and
[`process.stderr`](https://nodejs.org/docs/latest-v22.x/api/process.html#processstderr). The global `console` can be used without importing the `node:console` module.
_**Warning**_: The global console object's methods are neither consistently
synchronous like the browser APIs they resemble, nor are they consistently
asynchronous like all other Node.js streams. See the [`note on process I/O`](https://nodejs.org/docs/latest-v22.x/api/process.html#a-note-on-process-io) for
more information.
Example using the global `console`:
```js
console.log('hello world');
// Prints: hello world, to stdout
console.log('hello %s', 'world');
// Prints: hello world, to stdout
console.error(new Error('Whoops, something bad happened'));
// Prints error message and stack trace to stderr:
// Error: Whoops, something bad happened
// at [eval]:5:15
// at Script.runInThisContext (node:vm:132:18)
// at Object.runInThisContext (node:vm:309:38)
// at node:internal/process/execution:77:19
// at [eval]-wrapper:6:22
// at evalScript (node:internal/process/execution:76:60)
// at node:internal/main/eval_string:23:3
const name = 'Will Robinson';
console.warn(`Danger ${name}! Danger!`);
// Prints: Danger Will Robinson! Danger!, to stderr
```
Example using the `Console` class:
```js
const out = getStreamSomehow();
const err = getStreamSomehow();
const myConsole = new console.Console(out, err);
myConsole.log('hello world');
// Prints: hello world, to out
myConsole.log('hello %s', 'world');
// Prints: hello world, to out
myConsole.error(new Error('Whoops, something bad happened'));
// Prints: [Error: Whoops, something bad happened], to err
const name = 'Will Robinson';
myConsole.warn(`Danger ${name}! Danger!`);
// Prints: Danger Will Robinson! Danger!, to err
```console.Console.log(message?: any, ...optionalParams: any[]): void (+1 overload)
Prints to `stdout` with newline. Multiple arguments can be passed, with the
first used as the primary message and all additional used as substitution
values similar to [`printf(3)`](http://man7.org/linux/man-pages/man3/printf.3.html)
(the arguments are all passed to [`util.format()`](https://nodejs.org/docs/latest-v22.x/api/util.html#utilformatformat-args)).
```js
const count = 5;
console.log('count: %d', count);
// Prints: count: 5, to stdout
console.log('count:', count);
// Prints: count: 5, to stdout
```
See [`util.format()`](https://nodejs.org/docs/latest-v22.x/api/util.html#utilformatformat-args) for more information.log(`Ref count is: ${const countRef: any
countRef.value}`);
});
watchEffect(() => {
const doubleCountRef: any
doubleCountRef.value = const countRef: any
countRef.value * 2;
var console: Console
The `console` module provides a simple debugging console that is similar to the
JavaScript console mechanism provided by web browsers.
The module exports two specific components:
* A `Console` class with methods such as `console.log()`, `console.error()` and `console.warn()` that can be used to write to any Node.js stream.
* A global `console` instance configured to write to [`process.stdout`](https://nodejs.org/docs/latest-v22.x/api/process.html#processstdout) and
[`process.stderr`](https://nodejs.org/docs/latest-v22.x/api/process.html#processstderr). The global `console` can be used without importing the `node:console` module.
_**Warning**_: The global console object's methods are neither consistently
synchronous like the browser APIs they resemble, nor are they consistently
asynchronous like all other Node.js streams. See the [`note on process I/O`](https://nodejs.org/docs/latest-v22.x/api/process.html#a-note-on-process-io) for
more information.
Example using the global `console`:
```js
console.log('hello world');
// Prints: hello world, to stdout
console.log('hello %s', 'world');
// Prints: hello world, to stdout
console.error(new Error('Whoops, something bad happened'));
// Prints error message and stack trace to stderr:
// Error: Whoops, something bad happened
// at [eval]:5:15
// at Script.runInThisContext (node:vm:132:18)
// at Object.runInThisContext (node:vm:309:38)
// at node:internal/process/execution:77:19
// at [eval]-wrapper:6:22
// at evalScript (node:internal/process/execution:76:60)
// at node:internal/main/eval_string:23:3
const name = 'Will Robinson';
console.warn(`Danger ${name}! Danger!`);
// Prints: Danger Will Robinson! Danger!, to stderr
```
Example using the `Console` class:
```js
const out = getStreamSomehow();
const err = getStreamSomehow();
const myConsole = new console.Console(out, err);
myConsole.log('hello world');
// Prints: hello world, to out
myConsole.log('hello %s', 'world');
// Prints: hello world, to out
myConsole.error(new Error('Whoops, something bad happened'));
// Prints: [Error: Whoops, something bad happened], to err
const name = 'Will Robinson';
myConsole.warn(`Danger ${name}! Danger!`);
// Prints: Danger Will Robinson! Danger!, to err
```console.Console.log(message?: any, ...optionalParams: any[]): void (+1 overload)
Prints to `stdout` with newline. Multiple arguments can be passed, with the
first used as the primary message and all additional used as substitution
values similar to [`printf(3)`](http://man7.org/linux/man-pages/man3/printf.3.html)
(the arguments are all passed to [`util.format()`](https://nodejs.org/docs/latest-v22.x/api/util.html#utilformatformat-args)).
```js
const count = 5;
console.log('count: %d', count);
// Prints: count: 5, to stdout
console.log('count:', count);
// Prints: count: 5, to stdout
```
See [`util.format()`](https://nodejs.org/docs/latest-v22.x/api/util.html#utilformatformat-args) for more information.log(`Double count is: ${const doubleCountRef: any
doubleCountRef.value}`);
});
const countRef: any
countRef.value = 1;
const countRef: any
countRef.value = 2;
const countRef: any
countRef.value = 3;
var console: Console
The `console` module provides a simple debugging console that is similar to the
JavaScript console mechanism provided by web browsers.
The module exports two specific components:
* A `Console` class with methods such as `console.log()`, `console.error()` and `console.warn()` that can be used to write to any Node.js stream.
* A global `console` instance configured to write to [`process.stdout`](https://nodejs.org/docs/latest-v22.x/api/process.html#processstdout) and
[`process.stderr`](https://nodejs.org/docs/latest-v22.x/api/process.html#processstderr). The global `console` can be used without importing the `node:console` module.
_**Warning**_: The global console object's methods are neither consistently
synchronous like the browser APIs they resemble, nor are they consistently
asynchronous like all other Node.js streams. See the [`note on process I/O`](https://nodejs.org/docs/latest-v22.x/api/process.html#a-note-on-process-io) for
more information.
Example using the global `console`:
```js
console.log('hello world');
// Prints: hello world, to stdout
console.log('hello %s', 'world');
// Prints: hello world, to stdout
console.error(new Error('Whoops, something bad happened'));
// Prints error message and stack trace to stderr:
// Error: Whoops, something bad happened
// at [eval]:5:15
// at Script.runInThisContext (node:vm:132:18)
// at Object.runInThisContext (node:vm:309:38)
// at node:internal/process/execution:77:19
// at [eval]-wrapper:6:22
// at evalScript (node:internal/process/execution:76:60)
// at node:internal/main/eval_string:23:3
const name = 'Will Robinson';
console.warn(`Danger ${name}! Danger!`);
// Prints: Danger Will Robinson! Danger!, to stderr
```
Example using the `Console` class:
```js
const out = getStreamSomehow();
const err = getStreamSomehow();
const myConsole = new console.Console(out, err);
myConsole.log('hello world');
// Prints: hello world, to out
myConsole.log('hello %s', 'world');
// Prints: hello world, to out
myConsole.error(new Error('Whoops, something bad happened'));
// Prints: [Error: Whoops, something bad happened], to err
const name = 'Will Robinson';
myConsole.warn(`Danger ${name}! Danger!`);
// Prints: Danger Will Robinson! Danger!, to err
```console.Console.log(message?: any, ...optionalParams: any[]): void (+1 overload)
Prints to `stdout` with newline. Multiple arguments can be passed, with the
first used as the primary message and all additional used as substitution
values similar to [`printf(3)`](http://man7.org/linux/man-pages/man3/printf.3.html)
(the arguments are all passed to [`util.format()`](https://nodejs.org/docs/latest-v22.x/api/util.html#utilformatformat-args)).
```js
const count = 5;
console.log('count: %d', count);
// Prints: count: 5, to stdout
console.log('count:', count);
// Prints: count: 5, to stdout
```
See [`util.format()`](https://nodejs.org/docs/latest-v22.x/api/util.html#utilformatformat-args) for more information.log('Final depMap:', depMap);
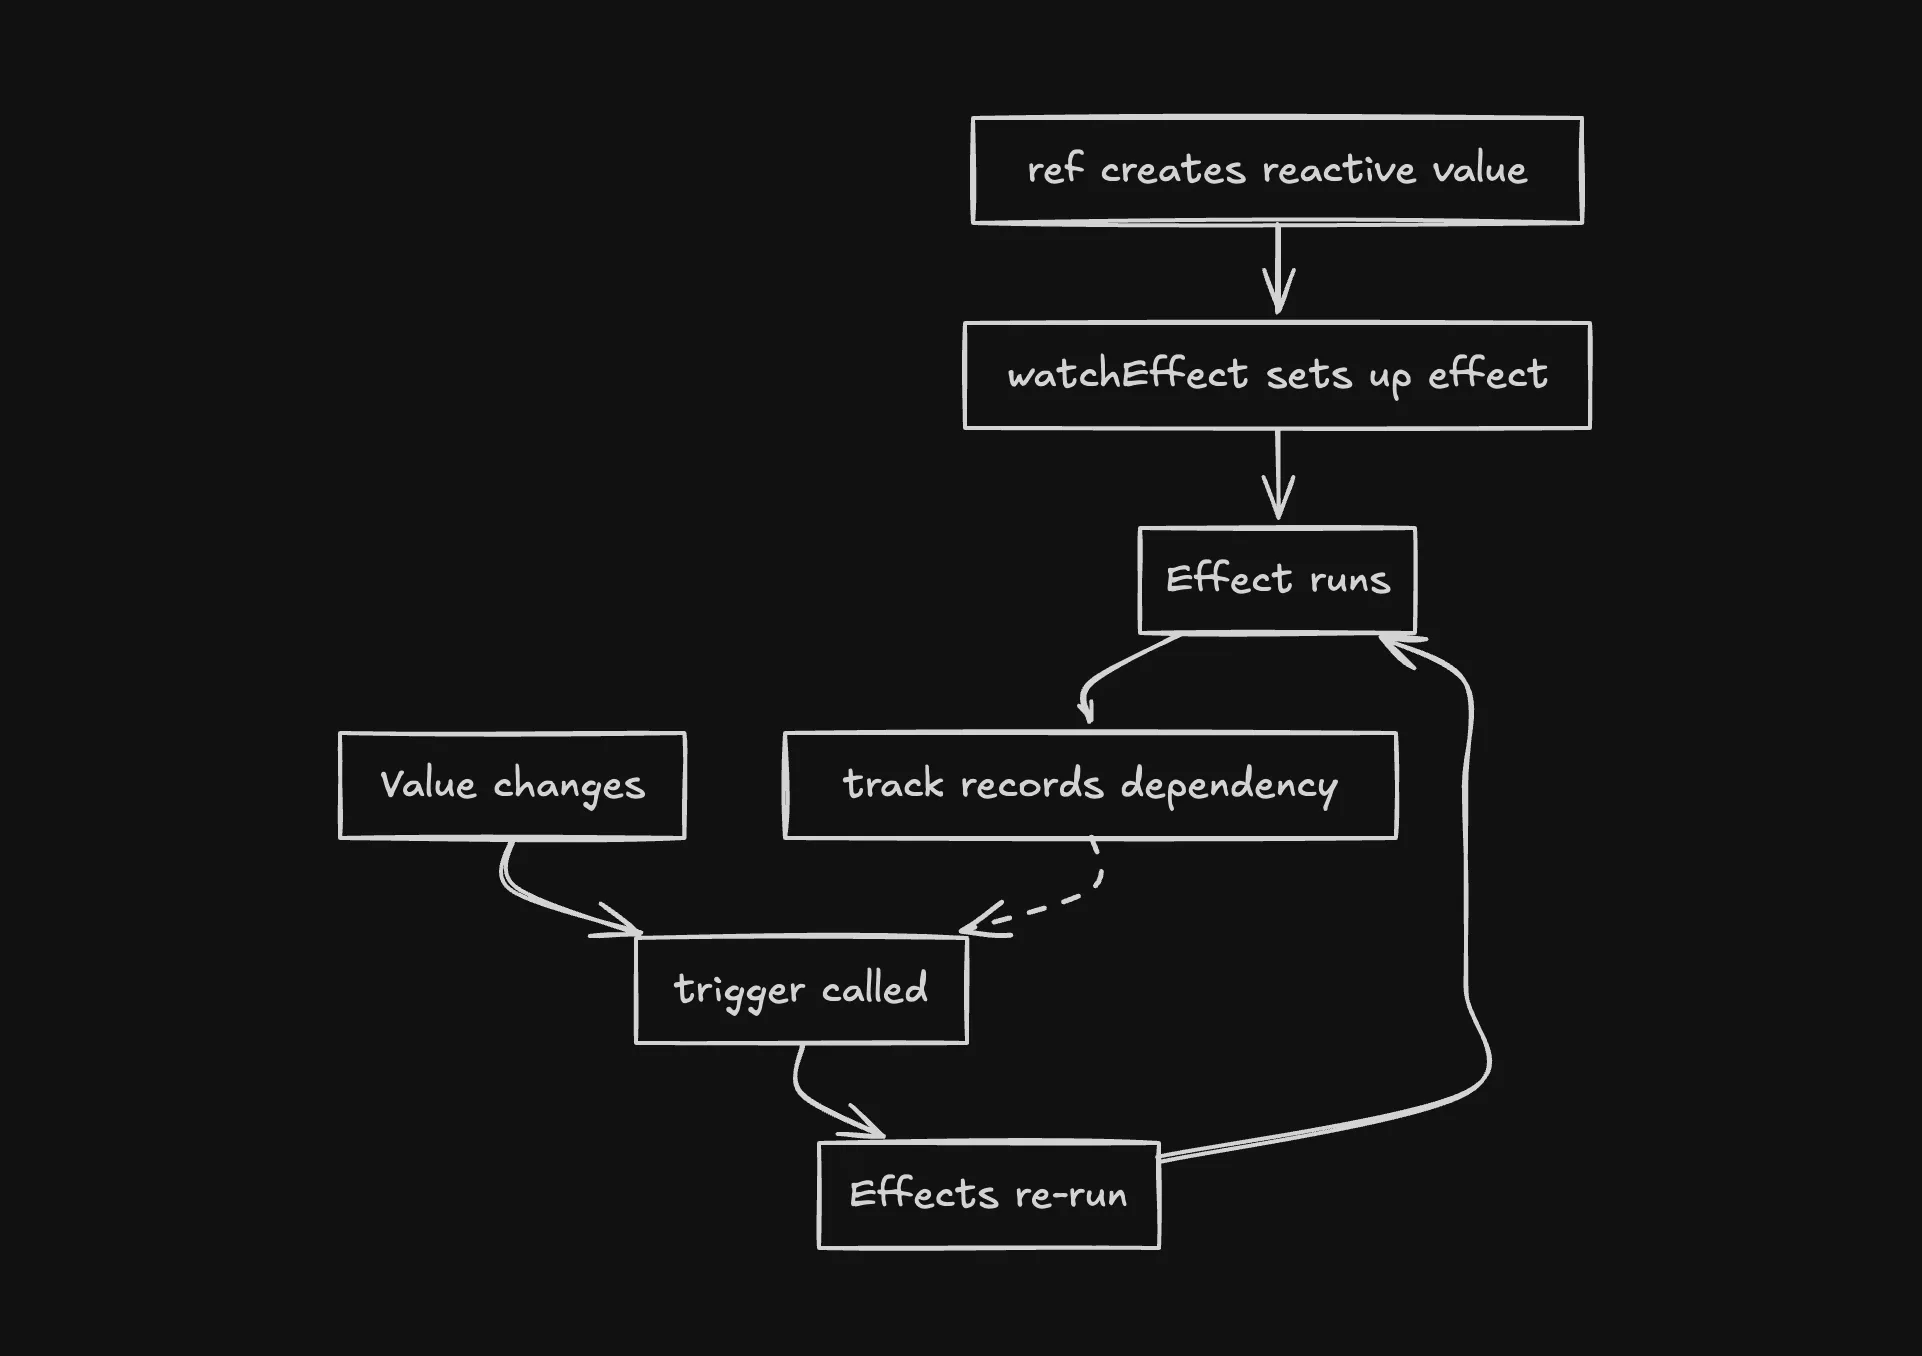
Diagram for the complete workflow
check out the full example -> click
Beyond the Basics: What’s Missing?
While our implementation covers the core concepts, production-ready frameworks like Vue offer more advanced features:
- Handling of nested objects and arrays
- Efficient cleanup of outdated effects
- Performance optimizations for large-scale applications
- Computed properties and watchers
- Much more…
Conclusion: Mastering Frontend Reactivity
By building our own ref
and watchEffect
functions, we’ve gained valuable insights into the reactivity systems powering modern frontend frameworks. We’ve covered:
- Creating reactive data stores with
ref
- Tracking changes using the
track
function - Updating dependencies with the
trigger
function - Implementing reactive computations via
watchEffect
This knowledge empowers you to better understand, debug, and optimize reactive systems in your frontend projects.
Footnotes
-
What is Reactivity by Pzuraq ↩